Why a clear cat 5 plug diagram matters for home security cameras
Understanding a cat 5 plug diagram is essential when you rely on wired security cameras. A correct diagram shows exactly how each cable and wire should terminate in the connector so that power, data, and video streams remain stable. When you misinterpret cat wiring, even a high quality ethernet cable can cause intermittent failures that are hard to trace.
In home installations, people often mix different cables and cords without planning the wiring diagram. They may run a bulk cable through walls, then attach a male connector or keystone jack at the end, and finally add patch cables to reach the recorder. Each transition between cat cables, patch cords, and adapters introduces another potential weak point in the cable diagram that can degrade video quality.
For Power over Ethernet security cameras, the ethernet cables carry both power and data, so every wire inside the cat cable must follow the standard. A cat 5 plug diagram clarifies which type of straight wiring pattern you should follow, usually T568A or T568B, and how each color coded wire lands on the connector pins. When you respect this standard on both ends of the patch cable, you avoid mismatched pairs that can limit bandwidth or cause the camera to drop offline.
Many homeowners also mix ethernet with other cords such as HDMI, USB, VGA, or BNC when building a system. While these cables cat variants serve different roles, the cat patch and flat patch segments remain the backbone for IP video. Treating every cable cat termination with the same care you give to visible devices is the first step toward a professional grade installation.
Reading the cat 5 plug diagram step by step for stable video
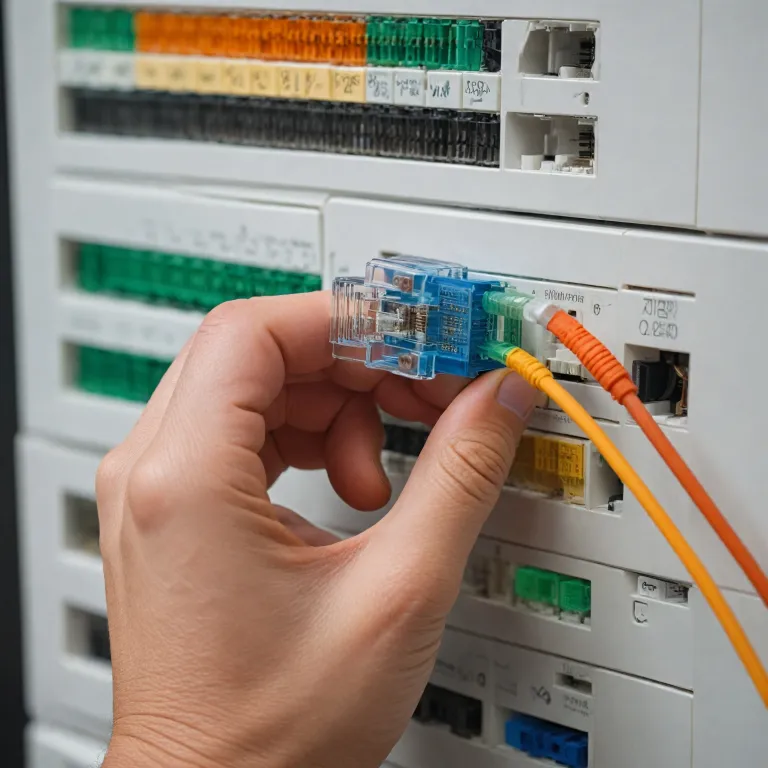
A typical cat 5 plug diagram shows eight wires arranged in four twisted pairs inside the cable. Each pair in the cat cable has a solid color wire and a striped wire, and the diagram indicates their exact order at the connector. When you prepare ethernet cables for security cameras, you must untwist only as much wire as needed to slide into the plug, because excessive untwisting weakens noise rejection.
Most home users choose a straight wiring pattern such as T568B for every ethernet cable in the system. The wiring diagram will label each pin number on the male connector and show which color wire belongs there, ensuring that both ends of the patch cable match. If one side follows T568A and the other T568B, you accidentally create a crossover cable instead of a standard straight cable, which can disrupt camera connectivity.
When crimping cat cables, pay attention to strain relief built into the plug housing. Proper strain relief grips the cable jacket, not just the individual wires, so that pulling on cords does not loosen the connector over time. This detail matters especially for outdoor security cameras where movement, temperature changes, and vibration can stress every cable cat run.
Some installations combine ethernet with HDMI or USB extenders to send video further than standard cords allow. In those cases, the cat wiring still follows the same cat 5 plug diagram, but the signal type riding on the wire changes. For ultra high resolution systems, you might pair IP cameras with a top 4K security camera setup, which makes correct wiring even more critical to avoid packet loss.
Choosing between bulk cable, patch cords, and keystone jacks
Planning a home system starts with deciding where to use bulk cable and where to rely on factory made patch cords. Bulk cable lets you pull long cat cables through walls and ceilings, then terminate each end according to the cat 5 plug diagram. This approach keeps visible cords shorter and neater, because you can finish each run at a keystone jack or patch panel behind the recorder.
Keystone jacks and keystone jacks panels use a slightly different wiring diagram than a male plug, but the color codes for each wire remain consistent. You punch each wire from the cable into the jack following the printed cat wiring pattern, then use short patch cables to connect devices. This method reduces wear on the main cable cat runs, because you only unplug and replug the patch cable ends when moving security cameras or recorders.
Flat patch and cat flat cords appeal to homeowners who want cables to disappear under rugs or along baseboards. Even with these slim designs, the internal wires must still follow the same standard as round ethernet cables to maintain performance. When you buy flat patch cords, verify that the manufacturer respects the correct wiring diagram and provides proper strain relief at each connector.
Some users try to repurpose old VGA, HDMI, USB, or BNC cords instead of installing new ethernet cable for IP video. While these legacy cables can still serve analog cameras or monitors, they cannot replace cat cables in a modern network. For reliable recording and local storage, especially when using systems highlighted in guides to security cameras with local storage options, structured cabling with a clear cable diagram remains the best long term strategy.
Integrating ethernet cables with other video and power connections
Home security cameras often sit at the intersection of network, power, and video technologies. A single ethernet cable can carry data and power, while separate HDMI, VGA, USB, or BNC cords may handle local displays or legacy devices. Understanding how each cable type works alongside the cat 5 plug diagram helps you avoid bottlenecks and signal conflicts.
For IP cameras, ethernet cables form the primary pathway from each camera to the recorder or switch. The wiring diagram ensures that every wire pair inside the cat cable supports the required bandwidth, especially when multiple security cameras stream high resolution video simultaneously. When you add patch cords between wall plates, keystone jacks, and network equipment, keep them as short as practical to reduce total cable length and potential interference.
Analog cameras still rely on BNC connectors and coaxial cables for video, sometimes paired with separate power cords. In hybrid systems, you might run both BNC and cat cables side by side, using the ethernet cable for newer cameras and the coax for older ones. Even then, following the cat 5 plug diagram precisely remains important, because IP cameras often handle the most critical views such as entrances and driveways.
Some homeowners use USB or HDMI extenders that convert signals to travel over cat cables, then back again at the other end. These devices depend on correct cat wiring and robust strain relief to maintain signal integrity over long distances. When planning such mixed systems, consult a detailed cable diagram and consider recommendations from resources on advanced security camera cabling and storage to balance performance, cost, and future upgrades.
Practical tips for terminating cat cables and avoiding common errors
Terminating cat cables correctly starts with choosing the right connector for your cable type. Solid core bulk cable usually pairs best with punch down keystone jacks or patch panels, while stranded patch cords work better with crimp on male plugs. Mixing the wrong connector and cable cat combination can lead to unreliable terminations that fail under strain.
Before crimping, arrange the wires according to the cat 5 plug diagram and trim them evenly so each wire reaches the end of the connector. Ensure the cable jacket extends far enough into the plug for proper strain relief, which protects the internal wires from bending and pulling. After crimping, gently tug the connector to confirm that the jacket, not just the individual wires, is held firmly in place.
When working with multiple ethernet cables, label each end clearly to match the corresponding security cameras and recorder ports. This simple step makes troubleshooting far easier if a video feed fails or a camera loses power. It also helps you track which patch cables connect to which keystone jacks, especially in larger homes with several floors and outdoor zones.
Do not run cat cables tightly alongside power cords, because electrical noise can leak into the wire pairs and degrade network performance. Maintain separation where possible, and cross power lines at right angles when necessary to reduce interference. For long outdoor runs, choose a suitable cable type rated for exterior use, and always follow the same wiring diagram so that every patch cable, flat patch, and cat flat segment integrates seamlessly.
Designing a future ready cabling layout for evolving home security needs
Thinking ahead when you design your cabling layout can save significant time and cost later. Even if you start with only a few security cameras, pulling extra bulk cable and leaving spare keystone jacks in key locations prepares your home for expansion. Each unused cable should still follow the cat 5 plug diagram so that it is ready for immediate use when you add new devices.
Centralizing terminations in a small network cabinet or structured media panel keeps patch cords organized and accessible. From there, you can connect ethernet cables to your router, network video recorder, and any switches using short patch cables that match the same wiring standard. This approach also simplifies upgrades, such as moving from basic HD cameras to higher resolution models that demand more bandwidth.
When planning for mixed technologies, reserve space for HDMI, VGA, USB, and BNC connections that may support monitors, legacy cameras, or specialty sensors. Even though these cords do not follow the cat 5 plug diagram, routing them alongside labeled cat cables in an orderly fashion improves maintenance. Over time, you can phase out older cable types while keeping the structured ethernet backbone intact.
As you evaluate equipment, remember that reliable wiring is as important as camera specifications or storage capacity. A carefully executed cable diagram, consistent cat wiring, and attention to strain relief can prevent many issues that users mistakenly blame on software or hardware. For homeowners comparing options, resources such as guides to top security cameras with local storage pair well with a solid understanding of how every wire, connector, and patch cable contributes to overall system resilience.
Key statistics about home security camera cabling and reliability
- Up to 80 % of connectivity issues in wired home security systems trace back to incorrect ethernet cable terminations or damaged connectors.
- Structured cabling with properly terminated cat cables can reduce long term maintenance interventions by approximately 30 % compared with ad hoc wiring.
- Using standardized wiring diagrams such as T568B across all patch cords and bulk cable runs helps maintain consistent performance as systems scale.
- Separating low voltage ethernet cables from mains power lines can cut electromagnetic interference related errors in video streams by more than 25 %.
Common questions about cat 5 plug diagrams and home security cameras
How does a cat 5 plug diagram affect camera image quality ?
A cat 5 plug diagram defines how each wire pair inside the ethernet cable carries data, and incorrect pairings can introduce errors that appear as dropped frames or stuttering video. When every connector follows the same standard, security cameras receive stable bandwidth, which supports higher resolutions and smoother motion. Good wiring cannot improve a poor camera, but it ensures you get the best possible image from the hardware you own.
Can I mix different cable types in one home security system ?
You can mix ethernet, HDMI, VGA, USB, and BNC cables in a single installation as long as each serves an appropriate role. The cat 5 plug diagram applies only to the ethernet segments, which typically handle IP cameras and network traffic. Other cords connect monitors, legacy analog cameras, or accessories, but they should be routed thoughtfully to avoid tangling and interference.
Is it better to use bulk cable or pre made patch cords for cameras ?
Bulk cable is usually better for permanent in wall runs because it allows custom lengths and cleaner routing to each camera location. Pre made patch cords work well for short connections between keystone jacks, switches, and recorders where flexibility matters more than exact length. Many homeowners combine both, using bulk cable for the backbone and patch cables for final device connections.
Do flat patch cables perform as well as round ethernet cables ?
Flat patch and cat flat cables can perform comparably to round ethernet cables when manufactured to the same category rating and terminated correctly. However, they may offer slightly less physical protection for the internal wires, so strain relief and careful routing become more important. For critical camera links or long distances, many installers still prefer high quality round cat cables.
When should I use keystone jacks instead of crimping plugs directly ?
Keystone jacks are ideal when you want a clean wall plate finish or plan to reconfigure equipment over time. Terminating bulk cable at keystone jacks and then using short patch cords to connect devices reduces wear on the main runs. Directly crimped plugs suit temporary setups or short, accessible cables, but they can be harder to replace if a connector fails inside a wall or ceiling.