The Basics of Security Camera Wiring
Essential Components of Security Camera Wiring
When it comes to setting up a security camera system, understanding the intricacies of camera wiring is crucial. The right knowledge can enhance both the functionality and reliability of your home surveillance setup. In essence, a security camera wiring system connects your camera to the power supply and a video display, often via a series of cables and connectors.Common Camera Wire Types
Deciphering camera wire types can be daunting, but it's essential for robust installation. Typically, coaxial cables (often known as coax) and Ethernet cables are most commonly used in security camera setups. Coaxial options include the popular BNC connectors that deliver dependable video signals, while Ethernet cables, especially CAT types, are prevalent in IP camera systems, supporting both power and video transmission through a single line, known as Power over Ethernet (PoE).Security Camera System Wiring Options
To ensure seamless video capture, choose the appropriate wiring option based on your system specifications:- CCTV Cameras: These usually rely on BNC connectors along with a separate power cable.
- IP Cameras: Use Ethernet cables for network connections, enabling PoE for simultaneous power and data transmission effectively.
- Wireless Security Cameras: Although generally wire-free, some models might still require minor wiring for power supply.
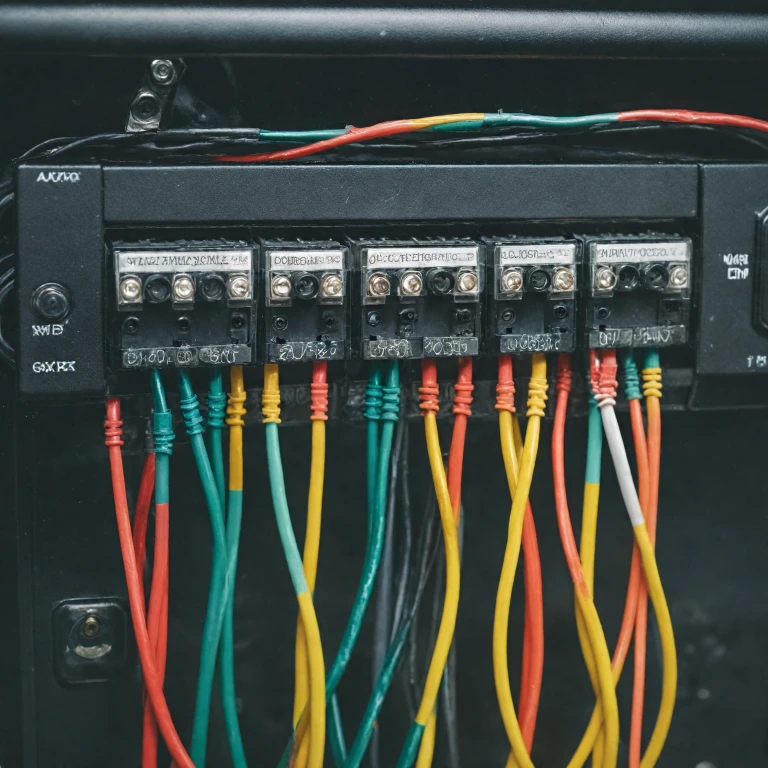
Decoding the 4-Wire Color Diagram
Interpreting Security Camera Wiring Colors
Understanding the 4-wire color diagram in your security camera wiring is crucial for efficient installation and maintenance. The wires are usually categorized by specific colors, each with a designated function that is vital for the system's operation.- Red Wire: This is typically the power wire. It connects to the positive terminal of the power supply, allowing electricity to flow to the camera system.
- Black Wire: Often used as the ground wire, connecting to the negative terminal of the power supply.
- White (or Yellow) Wire: Usually designated for video transmission and might be associated with the coaxial cable connector. It is important for transmitting the video signal captured by the camera.
- Blue (or Green) Wire: This color often represents the audio or data wire, notably if the system supports additional functionalities like intercom or motion sensors.
Tools and Materials Needed for Splicing
Essential Tools and Materials for Splicing Camera Wires
When it comes to splicing your security camera wires, having the right tools and materials ready is crucial. This ensures not only a successful connection but also the longevity and reliability of your camera system.- Wire Stripper: Essential for removing the insulation from the camera cables without damaging the underlying wires.
- Crimping Tool: Useful for securing connectors onto the ends of the wires. Make sure the tool is compatible with the specific connectors you will be using.
- Screwdriver Sets: Small screwdrivers are useful for opening casing and setting up cameras or fixing cables into place.
- Heat Shrink Tubing: Used to cover and protect wire connections ensuring they are shielded from moisture and other environmental factors.
- Electrical Tape: Invaluable for insulating the spliced areas and providing added protection to the complete installation.
- BNB Connectors: For coaxial cable wiring, BNC connectors are often used for video connections. Ensuring they are snugly and securely attached is critical for clear video quality.
- Ethernet Cable: If you're working with PoE systems, a quality CAT 5 or CAT 6 ethernet cable is necessary for powering and transmitting data to your cameras.
- Power Supply Adapter: Needed if your camera system isn't using Power over Ethernet (PoE), ensuring stable power supply to your security cameras.
Step-by-Step Guide to Splicing Wires
Carefully Connecting Your Security Camera Wires
Once you've identified the correct four-wire colors using the color diagram, you're ready to proceed with the splicing process. Precision is crucial during this stage to maintain the integrity of your home security camera system. Here is a detailed process on how to carefully splice your camera wires.
1. Preparing the Wires
Begin by stripping the outer insulation from each cable to expose the individual wires. Be cautious not to damage the wires during this process. For most cameras, you'll deal with power, video, and data cables, such as coax or cat cables. Ensure that you have clean, undamaged wire ends for effective connections.
2. Connecting Power Wires
Connect the power wire from the camera to the corresponding power supply wire. Typically, these will be red and black insulated wires for positive and negative connections. Ensure that your power source is compatible with the camera's requirements to prevent any damage to the system.
3. Joining Video Cables
If you are using a BNC connector for video signal, carefully insert the coaxial video cable into the connector. A solid video connection is critical, so ensure that the cable is securely fastened within the BNC connector. This connection allows for the transmission of video signals from the camera to the monitor or recording device.
4. Establishing Data and Ethernet Connections
If your camera system uses Power over Ethernet (PoE), you'll need to connect the data wires—often in a cat cable format. Align the data wires according to the standard cat cable color codes and secure them into an ethernet cable plug. A well-connected ethernet can carry both data and power in PoE systems, enhancing the efficiency of your setup.
5. Securing with Connectors
After the wires are correctly spliced and attached, use twist-on wire connectors or electrical tape to secure them. This ensures that the connections remain stable and protected from environmental factors, which is particularly important for outdoor cameras.
6. Conducting a Final Check
Before sealing the system, perform a final check to ensure all wires are securely connected, and no part of the cable is exposed unnecessarily. Testing the system at this stage can prevent potential issues with video feedback or power supply failures.
Properly splicing your camera wiring is key to maintaining a reliable and efficient home security system. Following these steps helps ensure your security cameras are correctly integrated into your home’s surveillance infrastructure.
Troubleshooting Common Wiring Issues
Overcoming Wiring Challenges
There can be several common issues when it comes to wiring your security cameras. Understanding these problems can greatly assist in maintaining an effective and reliable security setup.- Poor Video Quality: This could be due to a faulty camera wire or inappropriate cable connections. Ensure that cables, especially coax and ethernet cable, are not damaged and securely connected to the camera system.
- Inconsistent Power Supply: Sometimes, camera power issues arise from the failure of the power supply or loose connections. Double-check if the camera is receiving adequate power through the power plug. If you are using a POE camera system, verify that the POE switch or injector is functioning correctly.
- Signal Interference: This often happens if the camera wires are running near other electronic devices or strong electromagnetic fields. Using shielded cables like Cat cables can mitigate interference. Additionally, avoid running camera wiring parallel to power cables to prevent signal disruption.
- Connector Problems: Faulty BNC connectors or improperly installed connectors can hinder video signal transmission. Ensure BNC connectors are attached securely and have good contact with the camera cable.
- Drilling Errors: Drilling holes for Ethernet cables or Siamese cables requires precision. Incorrect drilling can lead to damaged wires, resulting in connectivity issues. Measure carefully before drilling and use proper tools to prevent accidental cable damage.
- Weather Exposure: Exposure to harsh weather conditions can lead to wire corrosion and degradation. Utilize weatherproof coatings on outdoor wires and ensure that BNC connectors and other exposed parts are waterproofed to protect your system.
Maintaining Your Security Camera Wiring
Ensuring the Longevity and Efficiency of Your Setup
Maintaining your security camera wiring is crucial for ensuring the long-term reliability and performance of your camera systems. Regular inspections and preventive measures can save you from potential malfunctions and costly repairs. Here are some tips to help you maintain your setup:- Regular Inspections: Periodically check the condition of all cables, including ethernet cables, coax, and siamese cables. Look for wear and tear, especially in exposed areas where the cables might be prone to damage.
- Protect Connection Points: Make sure all connectors, such as BNC connectors or plugs, are firmly attached and protected from environmental factors like moisture. This will prevent corrosion and potential loss of video signal.
- Cable Management: Keep your cables organized and secured. Avoid tangled camera wires, which can lead to unnecessary strain and potential breakage. Consider using cable ties to keep them neat and bundled.
- Check Power Supply: Ensure that the power source for your cameras, whether it's a direct plug or a power over ethernet (PoE) system, is stable. Regularly test the output voltages to ensure they meet the requirements of your camera systems.
- Clean Storage Area: If you store your equipment in an external or less maintained area, regularly clean the site and ensure no debris or pests can affect the camera cables or connectors.
- Software Updates: For those utilizing wireless security or smart camera systems, routinely update the software or firmware to keep systems running smoothly and securely.