Understanding the Basics of Camera Mounting
A Solid Foundation for Home Security: Camera Mounting Basics
When diving into the realm of home security, understanding how to mount your security cameras is a crucial first step. Mastering the basics of camera mounting can elevate your home's security system from ordinary to exceptional. But what does effective camera mounting entail? Here's a breakdown of fundamental aspects:- Different Types of Mounts: Whether it's a wall mount, pole mount, or something more specialized like an articulating arm or magic arm, knowing your mounts is key. Each has its specific use, varying in price regular and sale price, depending on the design and functionality. When comparing add options, assess the pros and cons of each, based on your outdoor or indoor needs.
- Camera Stability and Angle: A stable camera mount is critical. The right ball head or mount adapter can provide flexibility in adjusting camera views. Stability ensures your cameras capture clear images without blur from vibrations or movement.
- Weather Resistance for Outdoor Use: For outdoor cameras, choosing durable, weather-resistant mounts is paramount. A secure junction box or a strong mount bracket can shield against the elements, reducing maintenance needs over time.
- Compatibility with Camera Models: Not all mounts are universal. Ensure compatibility with your security cameras. Check the price unit and unit price of mounts to avoid mismatches.
- Ease of Installation: Some mounts come with comprehensive installation options, including all necessary brackets and arms. Compare add different items to find one that matches your skill level and installation resources.
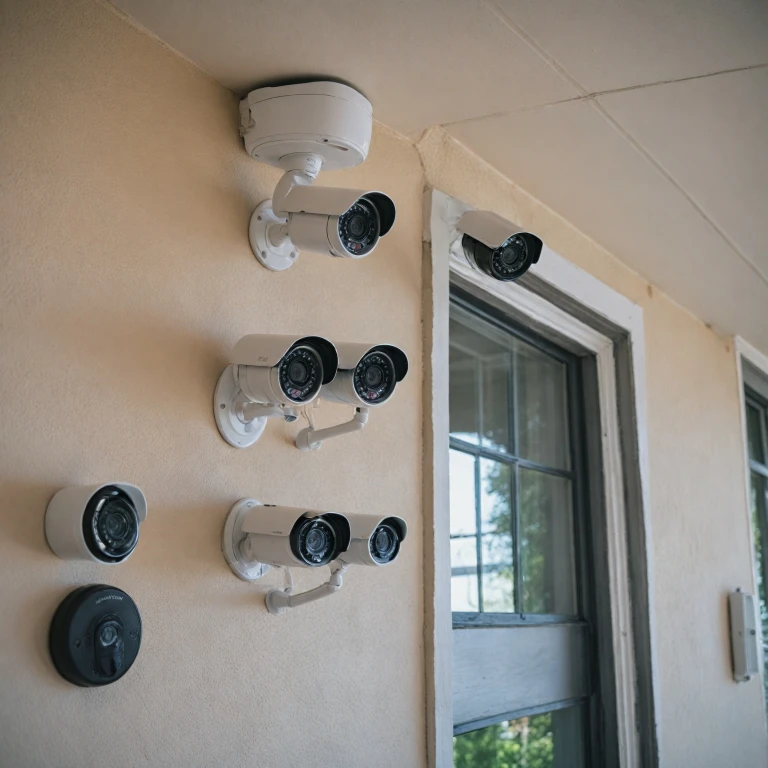
Choosing the Right Location for Your Cameras
Optimal Locations for Camera Installation
Identifying the right location is pivotal when installing your home security cameras. A camera mount is only as effective as its positioning. Placing the security camera wisely ensures comprehensive view coverage and, ultimately, a safer home. Here are critical considerations to keep in mind:
- Entry Points: Focus on high-traffic areas like front doors, back doors, and windows.
- Height and Angle: Positioning your cameras at a high angle prevents tampering and captures wider areas.
- Outdoor Conditions: Choose outdoor-rated mounts to withstand weather elements.
- Lighting: Ensure adequate lighting or use night vision capabilities for low-light conditions.
Consider using a wall mount with an articulating arm for adjustable angles, or a pole mount to secure security cameras onto poles or similar structures. In some scenarios, a junction box may be necessary to contain and protect cables where they connect. You might also explore utilizing a magnetic mount for easy repositioning.
Understanding these factors aids in selecting the right mount bracket and camera type, aligning with your specific security needs and budget, whether it's a low price regular or a more sophisticated unit at a price sale.
Tools and Equipment Needed for Camera Mounting
Selecting Your Essential Tools and Equipment
When it comes to camera mounting, having the right tools and equipment is crucial for a successful installation. To begin with, consider the type of camera mount you’ll be working with. Whether it's a wall mount, pole mount, or a magic arm, each requires specific gear to ensure stability and proper security. For any wall mount system, you'll likely need:- Drill: An electric drill is essential for creating holes to secure mounts. Make sure to use a drill bit that corresponds to the wall material.
- Screwdriver: Necessary for tightening screws, especially those that may need a final hand adjustment.
- Level: To make sure your security cameras are mounted straight, which is crucial for accurate security monitoring.
- Tape Measure: Helps to measure the exact placement and distance requirements for your camera installation.
- Mount Bracket Set: These often come with the camera, or you can compare and purchase brackets that fit your model.
Consider Special Equipment for Unique Mounts
Depending on the mounting surface and location, additional tools or equipment might be required. Here are a few items to consider:- Junction Box: Ideal for outdoor security camera installations, these protect cables and connections from the elements and provide a neat finish.
- Articulating Arm or Ball Head: These allow for more flexible camera positioning and adjustments after mounting.
- Clamp or Pole Mount: Useful for attaching cameras to poles or fences, often seen in commercial or industrial settings.
- Mount Adapter: Ensures compatibility between different camera models and mounting systems.
Assessing the Financial Aspect of Camera Mounting Tools
Before diving into your shopping cart, consider the overall price of the equipment. The regular price of these tools can vary greatly depending on the brand and functionality. Explore sales to find deals that reduce the regular price to a more budget-friendly unit price. Remember, investing in quality equipment will likely save you time and ensure longevity in your security setup.Ensuring Secure Fixation
Lastly, do not overlook the importance of security screws, which offer an added layer of defense against tampering. For more on securing your setup, explore the importance of security screws. This knowledge can make the difference between a temporary fix and a long-term security solution.Step-by-Step Guide to Mounting Your Security Cameras
Step-by-Step Process for Securing Your Home with Camera Mounting
- Unboxing and Inspecting Your Equipment: Upon receiving your security cameras, inspect all included components such as the camera mounts, brackets, and any relevant hardware. Make sure everything is in place, avoiding the need for additional items or trips to the store. Double-check the sale price and regular price if you're considering more purchases.
- Preparing Your Mounting Surface: Before securing the camera mount, ensure that the wall or pole surface where your camera will be attached is clean and durable enough to support the camera unit. It's crucial to consider the outdoor elements if your cameras are for external use.
- Positioning and Aligning the Mount: With the selected mounting location from your decision-making, align the mount bracket properly, keeping in mind the optimal view and range for capturing footage. Using an articulating arm or a ball head allows for better adjustment flexibility.
- Attaching the Camera to the Mount: Secure the camera onto the mount adapter, ensuring a tight fit to avoid dislodging. Use a clamp or a bracket to secure the position firmly. Check that the articulation allows you to adjust the angles as needed post-installation.
- Drilling and Fixing the Mounted Setup: Drill into the selected surface, whether a wall or ceiling, and use screws to tighten the mount bracket in place. Utilize a junction box to hide cables neatly, giving a tidy appearance and adding an extra layer of security against tampering.
- Connecting Wiring and Testing: Once the camera is securely in place, connect the necessary wiring. If the setup requires more effort, consider hiring a professional to avoid potential mishaps. Test the cameras to ensure they are operational and adjust their view as needed.
With these steps, adding a robust layer of security by mounting cameras is efficient and straightforward. It's important to regularly compare add to your system over time, ensuring your home remains protected as new technological solutions become available in the market.
Common Challenges and Solutions in Camera Mounting
Overcoming Mounting Obstacles in Home Security
When it comes to mounting security cameras, several challenges may arise that could complicate the process. However, recognizing these potential hurdles ahead of time and knowing the solutions can greatly ease the installation process. Here are some common issues and how to address them:
- Uneven Surfaces: Securing your camera onto a crooked or bumpy wall can affect the stability of the mount and the angle of view. It’s advisable to use a wall mount bracket with adjustable aspects like a magic arm or articulating arm which can easily adapt to the surface irregularities.
- Limited Mounting Options: Often, certain areas require a more specialized mount such as a pole mount, corner mount, or even a clamp or tripoded stand to add flexibility. These can be particularly useful for challenging outdoor spots.
- Wire Management: Organizing cables can be a hassle, especially in outdoor settings. Consider using junction boxes to keep wiring neat and shielded from the elements. These are crucial for maintaining the original integrity of your security cameras and ensuring consistent performance.
- Adjusting For Optimal Viewing: Adjustability is key in maintaining your camera’s optimal view. Choose mounts equipped with a ball head joint offering swivel capacity or compare add options with tilt capabilities.
- Weather Considerations: Outdoor security cameras should be mounted with weather-resistant features. Products on sale may sometimes lack durability. Always compare the regular price units to ensure quality and longevity in harsh conditions.
- Cost Management: Balancing budget and quality can be tricky. Sometimes, the unit price of a camera mount might seem steep. However, considering sale prices and offers to add items to your cart at a reduced cost can mitigate expenses without compromising on securing your home.
Knowing these potential hurdles and planning with foresight will help smooth the mounting process, leading to a more secure and efficient camera mount deployment.
Maintaining and Adjusting Mounted Cameras
Ensuring Longevity and Efficiency After Installation
To maintain the efficiency of your security cameras after they've been mounted, regular checks and adjustments are crucial. Here’s how to ensure your setup remains in peak condition:- Regular Inspection and Cleaning: Dust and debris can accumulate on the lens, affecting the camera's view. Clean the lens and surrounding area to ensure a clear image. This is particularly important for outdoor cameras, where dirt can easily adhere to the lens.
- Testing the System: Periodically test your cameras to ensure they’re functioning well. This includes checking the live feed and making sure the camera is transmitting data effectively.
- Firmness of Mounts and Brackets: Check that the mount brackets, wall mounts, or pole mounts are still securely fastened. Over time, mounts can loosen, which might compromise the camera's angle or cause it to fall.
- Adjusting the View: Situations can change, and you might need to adjust your camera's view. Utilize mounts with a ball head or an articulating arm to reposition the camera without hassle.
- Inspecting Junction Boxes and Clamps: Ensure your junction boxes and clamps are intact to prevent any damage from affecting your security camera’s performance. These components protect wiring and secure camera mounts.
- Software and Firmware Updates: Keep your camera’s firmware up-to-date to protect against vulnerabilities and improve performance. Check the manufacturer’s website for the latest security patches and updates.